Sunday, July 26, 2015

Heart Transplant: Part 1


Lean on me

Working on the car by yourself can be a peaceful experience.   For me, it is a multitude of things:

  • It is an escape from the stresses of life,  a safe zone.    To me, being under the car almost reminds me of when I was a kid and made forts out of blankets and couch cushions.    Except now the fort ceiling is about a foot off the ground and covered in an inch thick concoction of all the fluids my car can possibly leak.
  • A challenge to learn something new; like what possible mathematical magic angle do you need to be at to get that bolt back in  that you just took out?  
  • How to grab that socket/nut/whatever that is laying just out of reach, on the other side of the way your wrist can even bend? And you weren't smart enough to raise the car any higher so you don't have enough room to move your elbows...you attempt to roll but your shoulders are wedged - so you twitch and flail while your wrists are bent at ninety degree angles, slowly pushing that stupid screw/nut/whatever away until you finally rage quit and re-stab yourself back under the car...
  • What was I talking about again?

Oh yeah - ignoring my cynicism,  it is actually pretty fun and peaceful.  But there are times when you just need a friend's help with stuff.  Whether it be for their knowledge, their extra hands, strength or just plain moral support, a friend or friends can be life savers.

Engine swapping is definitely one of those times where you NEED friends.   And I'm super lucky to have a few friends that are not only knowledgable in this area but are willing to help me out.

But let me preface this with a prerequisite of what kind of friend(s) you want around.  If you are new to this, you will want friends that you are comfortable with them seeing you are your worst and/or weakest, whatever that may be for you.   You are going to get pissed off, frustrated, annoyed, disappointed and possibly even physically hurt.  Wait, you WILL get hurt.   And it will probably be your own damn fault.

Okay, on to actual engine work.

Getting ready for the pull

This part is actually straight forward.  I got this done around the 17th so forgive me if I forgot some details.


  1. Got under car.
  2. Unbolted exhaust manifold flanges from the rest of the exhaust pipes.
  3. Got gelatinous ATF goop in hair and on face. 
  4. Got some sort of crud in eye balls.
  5. Didn't grab safety goggles....  WEAR YOUR SAFETY GOGGLES PEOPLE.  
  6. Removed transmission inspection plate
  7. There were four of them
    1. Rotate crank about 90 degrees to remove the next one. 
    2. This will remove the connection from the engine's crank to the transmission's torque convertor.
  8. Removed all but the top two bellhouse bolts - (that is what secures the engine to the transmission).
  9. ENGINE MOUNTS: Since this was my first time attacking this, I didn't really know what the engine mounts looked like.  So for some reason, I didn't think I could get to the single long bolt that held the two mounts together.  So I stupidly opted to disassemble the four bolts that are attached to the frame.  This was a very long, frustrating process as I attempted to navigate a swivel attached to a long extension underneath the control arm and onto an almost invisible bolt head.   (four of them actually)
QUICK RANT:
Safety goggles are amazing but for some reason, my eyeballs turn into mini saunas when I'm under the car and fog the goggles up pretty quickly.  ALSO - each single piece of crud on this engine managed to do a 'Porkin's from Star Wars' by navigating the crevices of my face wrinkles and then dive bombed directly into my eye balls.  At which point I gave up washing my face off and just permanently winked at the dark void that housed these stupid invisible motor mount bolts.   

Anyway, what seemed like an hour later, the mounts were free.  This was after several trips to the sink to wash my eyeballs out.  I was stupid cranky at this point.   

At the time, we didn't have a big enough cherry picker available, so instead, we used the car lift to attempt to yoink the engine out.  This actually worked pretty well - well, it did after I realized I forgot something....


So once we got it secured, we removed what I thought were the last two bolts.  We are shoving, pulling, shaking this engine but it just wasn't giving up. 

I get under the thing and discovered I missed a bolt.  Queue up a few joking/jabbing comments from the crowd above the car.  With frustration building, I fail to find the angle to get to that stupid last bolt.  At that very moment, like a shooting star in the dark,  one last piece of crud from the engine managed to delicately, silently fall onto my eye.  

After throwing a silent temper tantrum, I lay on the floor, defeated.  With that piece of grease or whatever nestling deeper into my eyeball.   I had safety goggles but I probably threw them somewhere by this point....

Boom. They appear in my hand.  Friggin' Jim is on it and rallies me back into action.  That bolt comes out and the crew above me managed to hulk the engine out of the bay.

The Pull


Jake removed the flywheel and plate from the engine.

Yay.


So check out these old exhaust manifolds...


Cracks everywhere.  Also, it looks like someone attempted to repair these manifolds with JB Weld.


Yuck. 


I just wanted to capture how dirty I was but honestly, it felt way worse than I looked.    Anyway, I have more to come - the engine has been stabbed so I'll get that written up ASAP.  


Until then!

Saturday, July 11, 2015

Final Engine Specs

Role Call for the engine:

  • D1VE Block (2-bolt main)
    • .030 over (4.390 bore)
  • D0VE ported heads 
    • 75cc closed chamber
    • 2.08 / 1.65" valves
    • 305/180 cfm @ .600 lift
    • Decked .025" for additional static c/r 
      • (altitude adjustment)
    • guide plates, manganese bronze guide, p/c viton guide seals
    • PRW 1.73 ratio steel body rocker arms
  • Trick Flow Chromoly Pushrods
    • 8.8" intake, 8.9" exhaust
  • Voodoo cam 
    • 213/219 / 110 +4 cam and hydraulic lifters
  • Stock 460 crank
    • polished/honed
    • 3.85" Stroke
  • Stock rods
    • #C9AE 6210-B
  • KB Hypereutectic Dished Pistons
  • Duraspark II Distributor and Ignition module
  • Edelbrock Performer RPM intake
  • 1411 Edelbrock Carburetor  
    • 750 cfm
    • Jetted for altitude
  • Stock replacement water pump
  • Standard flow oil pump
  • Stock replacement oil pan
  • ARP bolts and studs
  • Fel-Pro gaskets

Dyno Results:

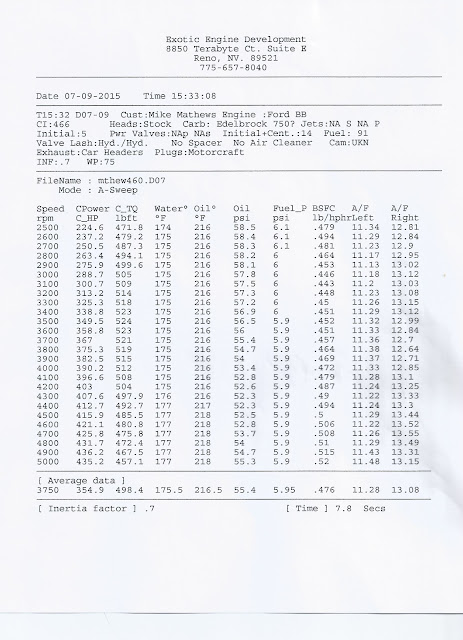
  • Torque: 524 @ 3500 
  • Horsepower: 436 @ 4900
Video of it running: Dyno Run

More specs (click for large):

Thursday, July 9, 2015

The desire to Dyno

Click-bait photo time!

Not mine but everyone in Reno has witnessed this spectacle at least once.

We last left off when I was attempting to get my engine to the dyno.  Well, there were a few check boxes I needed checked first.

1.  The water pump has to be driven by the crank somehow.
2.  I need to provide my ignition setup.

Let's go into these two in detail.

The Quest for Water

Normally, my current engine has two v-belts that are attached to the crank pulley;  
  • a 52" belt that drives the water pump AND the power steering pump 
  • a shorter one that drivers the alternator.
Pictured: NOT my old engine - this is way too clean!
As you can see, the power steering pump is on the far right, the alternator is the far left of the picture.  The top is the water pump and the thing that drives it all is the pulley attached to the actual crank of the engine at the far bottom.

GOAL: 
Make that top pulley spin for the dyno!  
Also, do this in a day or two because time is limited!

Cool, just attached all the accessories (power steering, alternator) like pictured above right?
Nawp.  Power steering pump will burn out on the dyno being ran dry like that.

And with limited time - I could not find some sort of pulley/idler solution.  So that means I have to find a belt that fits the alternator, water pump and crank.


So make something that is this:


Go to this:

Solution:
Using string, I measured an approximate circumference for all the pulleys which is 42".   Napa has a belt like this in stock.   Boom!  But wait!

PROBLEM:
The bracket/bolts I have for the alternator are too short to reach the waterpump's pulley.  The alternator needs to stick out forward about another solid inch. ...

SOLUTION:
A box of 100 washers and bigger bolts.  When in doubt, EXTEND IT OUT!!!


Boom.  We will just add a few couple dozen washers here and here and here.....


Tada!!!

Give it some spark!

The dyno will also need the ignition box I use, which is a standard Motorcraft Duraspark II ignition module. I yoinked the box and my custom made harness I have for it and at this time, remembered to check the gap of my sparkplugs as well; .045.  Which fortunately, all the plugs were pre-gapped at this spec.

The engine is now ready to go to the dyno!

The Transporter

 But how?

Listen, I'm just going to leave you with some pictures.   You guys can figure out how it happened. Yes, I am very well aware of how this is not the optimal way of doing things but this is one of my personality flaws (and apparently I share them with my friends) - just get it there.


Tada!!!!!!!!

Also - heads up everyone - don't do this.  An engine stand is just that - a stand, not a transport container.  I warned you!

DYNO TIME!!!


Pictured: My awesome headers that were specially made for this build and the LTD.


Let's break it in, right?

Engine starts, temp is good, oil PSI is good....put it under load and OIL PRESSURE DISAPPEARS.

Did I screw up the torquing of the main caps?  Did the cam get smoked???  The oil pickup tube crack?  Oil pickup clearance issue?   UGH!!

The oil filter was cut open to reveal nothing suspicious.  Which means the cam is fine.  Phew....but what?

MISTAKES I MADE THAT WERE MADE APPARENT VERY QUICKLY:

I didn't tighten down the rocker arm locker nuts tight enough.  Literally your "IS IT PLUGGED IN" type of issue.    This caused two rocker arms to shake loose enough to let the push rods get kicked out and one of the lifters ejected!  Which means the oil galley to that lifter was free to pump all its oil back into the block....

Fortunately, that explains the oil pressure loss.   
Also, bonus luck; nothing was damaged, at all.  Everything was placed back into it's correct spot (BY THE WAY, I MANAGED TO MIX UP THE EXHAUST AND INTAKE PUSH RODS ON THE DRIVER SIDE BANK SOMEHOW AGAIN - RAD). One more thing was noticed - the super cool plate I put in to block off the heat exchange passage?  Not only caused a gap but was causing too much tension on the aluminum intake which could cause damage.  So that was rightfully tossed.

Finally, everything is put back together.  Pushrods put in the right place and rocker arms tight and solid.

IT'S ALIVE!!!


Compression test looked great, timing great, ZERO leaks and the oil pressure remains at a solid 50-60 PSI.  Break-in period goes without issue!!!! 

DYNO TIME


Click for full size versions or skip below:


RESULTS:
  • 524 lbft of Torque @3500
  • 436 HP @5000
Important side note:
I'm out of typing steam due to a fierce headache but I do want to finish this post by saying that this would not have been possible without the help of good friends and family.   Whether it was a helping hand, advice, (A FRIGGIN TRIP TO THE DYNO BY AN ENGINE EXPERT) or just the company, it all directly attributed to the final build of this engine.   Thank you from the bottom of my heart!!

Next stop, the BEAST!

Until then!

P.S.
Engine Nerd stuff: For those curious, here is my timing and cam info: (click for bigger)


Thursday, July 2, 2015

Cross your fingers

The engine is at the dyno!

Next update coming soon - cross your fingers for me!