Or rather, I fixed her indigestion.

Unrelated: Zoe, my garage dog.
So a few things happened that I needed to troubleshoot:
- The Beast is IMPOSSIBLE to start. Seriously, I'm going to melt my alternator wires at this rate by putting such a heavy load on the system. It is like a 10-15 minute ordeal of dumping fuel into the carb.
- The micro-controller for the fuel pump got its fused popped once.
- When it is really hot out and after a bit of driving; the car won't idle without "double-pedal" action.
Let's address #2 on this list first.
(Author note: Me at the time of writing this - "I'm going to need my Windows laptop, I need MS Paint and the mouse)


So there is a stick figure guy there. He is loading bearing - if I deleted him, this whole diagram would collapse.Pump up the Jam
I have several theories that contributed to the micro-controller rage quitting on me the other day.
- I mounted the controller on the engine side of the fire wall. I baked it like a pie. As heat rises, resistance goes up, which causes the controller and/or the pump to draw more to get the needed volts. Like a clogged malt shake straw.
- I recently discovered I forgot to put a nut on the alternator's battery connection post. Soooo the terminal ring...kind of, sort of came off. Oh, but its will to live was so strong; it still made a connection through the air....but the connection obviously wasn't strong enough. Leading to the last half of theory #1. (Remember how I said that I was suddenly reading 11v?)
- The Beast found out I was cheating on her with my wife and the SHO I bought a couple winters ago. *shrugs*
But there are SOLUTIONS to these problems!
First, secure the damned alternator nut, dummy. Man. That is like the first question in tech support; IS IT PLUGGED IN SIR? SIR??
Second, Mount the controller on the inside of the car so I don't fry the thing from engine heat.
Third, let's be a bit more cautious with our wiring setup. Credit to Jacob on this - let's go into detail here.
Currently, here is how the fuel pump is wired:
MS PAINT!
So when I turn the key to the 'on' position, the relay will get the signal. That relay actually powers a few things but let's focus on the pump. Once it gets the signal, it will tell the controller, "Hey, go ahead and suck some power from the Battery 12v line and feed the rest to the Fuel Pump."
So the controller is responsible for not only powering itself off of the battery line but also delivering the fuel pump its power too.
PROBLEM: What if the fuel pump became a bit overzealous and wanted to draw more than what the microcontroller can handle? All that current has to go through the microcontroller....and if it is too much? Pop goes its fuse. Now I'm not saying that is what happened, but it is and was a possibility. So let's avoid that all together.
SOLUTION:
Holy hell my ms painting sucks. Guys, go look up how a relay works because my diagram does not demonstrate this...it kind of requires you to know how it works to make any sense. But let's add another relay to this equation...


Love the wire colors - yellow is ground.
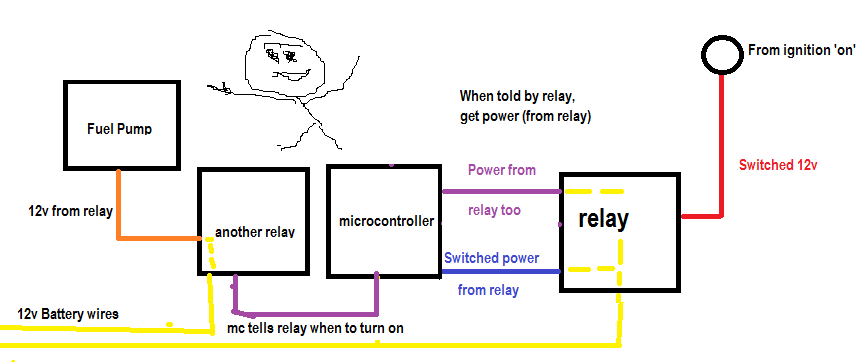
This looks way more complicated than it is.
- Key turns 'on'
- Relay tells micro controller that it can power on.
- Micro controller just takes its power from the relay source.
- Micro controller tells another relay, hey, I'm on - so you turn on too.
- 'Another relay' says HEY FUEL PUMP, here is your very own battery 12v line. Go hog wild.
End result: Microcontroller and Fuel Pump has there own wiring for 12v source. Also, each line has its own fuse as well.
Moral of the story: The microcontroller is most likely extremely sensitive to heat. So don't put that in the engine bay.
Moral of the story: The microcontroller is most likely extremely sensitive to heat. So don't put that in the engine bay.
With that solved; let's tackle #1 and hopefully #3 on the list.
She's cold blooded
She never used to be, but with a new heart, maybe something changed? Starting her is literally a 10 minute process of spraying the carb with starter fluid, manually closing the choke on the carb and then attempting to start the Beast.It was getting to a point where the alternator wire would smoke. I'm going to start a fire if I don't fix this.
Thoughts:
Jacob was thinking it could be the accelerator plunger; it was messed up in a way were it was not successfully getting the engine enough gas on start up (and would explain why I couldn't just step on the pedal without killing it as well)
Also, the electric choke is a bit ore complicated than I made it out to be - I can't just take the electric cap off it and expect things to work normally.
So....time to rebuild the carb!
So fortunately, I am armed with a Carter/Edelbrock rebuild book. So this should be fairly easy.

First step - pull carb off the engine and prepare a work space. (also, close off the giant gapping hole in your intake before you drop a nut or something down there...)

Protip: get some trays or something to organize all the parts you take off. I took pictures not just for the blog but more so I can put it back together again too.

Strip everything down.

The left and right bowls have gunk in them. So that is a sign that this was a good idea.

Here is the main problem - the accelerator plunger...

Oh holy crap - yeah that is toast. Kind of hard to plunge stuff if it can't create a seal.

Idle Mixture screws - bit of carbon on the ends there.

The bottom cylindrical part is where the accelerator plunger goes; notice more pieces of that plunger sitting at the bottom there.

The primary (bottom) and secondary (top) jets. Those round brass thingies - that is where the fuel goes to feed the engine. With everything taken apart - I clean everything out using some acetone.

Kay. Ready to do some calibration and put everything back together - let me just check the instructions....

Bah - what the heck is this?
Me:

"Not reading all of this." (says the people about this post too haha)

Fresh new gaskets, springs and other important doodads.

So here is an important part: the floats. They have to be a precise measurement from the top and have to hang down a very specific height as well. This is responsible for actually letting gas into your carb and will stop the fuel feed if the carb gets too full.
Last time I did this, I must have had my eyes closed while being drunk because both floats were crazy out of alignment.

I hate this part so much. I'm not a really precise type of dude. I'm more of a dynamite fishing type of guy. Measure - bend some more, measure, bend some more - repeat.

That is a filter that is full of gunk. I'm sure this didn't help at all.

Put it all back together. Make sure I'm not missing parts....

Almost all back together. You know what it is missing still? That stupid electric choke.

Well look at that. The air cleaner housing fits over the carb even with the electric choke attached! Amazing what a ball ping hammer will do to make things....fit. Tada!
So guess what? The Beast starts RIGHT up now. Wooo!

So the next test is to drive the car around for a day and attempt to replicate the "I can't idle when I'm hot" thing. Hopefully, it's gone completely but we shall see.
Until then!